How to Register or Sign In to the Website
Follow the steps below to create a new account or access your existing one:
1 Access the Sign-In Menu
- Navigate to the top-right corner of any page.
- Click the My Account icon .

You’ll be redirected to the Registration Page where you can choose how you want to register.
2 Choose Your Registration Type On the registration page, you have three options:
Option 1 - Login:If you already have an account, enter your username or email address and password, then click “Log in”. If you’ve forgotten your password, click “Lost your password?” to reset it.
Option 2 - Become a Customer:Enter your email address and create a password, then click “Register” to create a buyer account.
Option 3 - Become a Vendor :Click “Become a vendor” to join the community of therapists and start selling your educational and therapeutic materials.

Already Have an Account?
Simply enter your credentials, and click “Login” to get started.

By following these simple steps, you can register as a new user, log in to your existing account, or even become a vendor on the platform. Become a Customer
Create a Simple Product
1 Access the Products Section
- First, we need to click on the “products” option in the sidebar menu.

2 Create a New Product Next, click on the “Add New” button to add a new product.

3 Configure the Product
Now, we can start creating the new product. You can select the “Simple Product” option from the dropdown.
These three options represent the type of product we want to create:
Catalog: Represents a physical product such as a book, magazine, or any other tangible item.
Virtual: Represents a product that is a digital asset.
Upload: Represents technological products that will be available for download upon purchase.

Simple Product - Fill in Product Information
Product Title: Enter the product title here.
Price: This field represents the full price of the product.
Sale Price: If you want to offer a discount, you can enter the final sale price here.

Add Description and Media
Short Description: Add a brief description of the product.
Description: Provide a more detailed description of the product.
Add Media: You can add images or videos of the product by clicking on “Add Media”.

Add Categories and Subcategories
Categories: Select the appropriate categories for your product. This helps in organizing your products and makes it easier for customers to find them.
For now, the Brands and Tags sections will not be used. Ensure that you provide as much information as possible and use high-quality images to attract potential customers. Once you have filled out all the fields, you can publish the product to make it available on your website.
Inventory Settings for Your Product
In the Inventory section, you can manage various aspects of your product’s stock.
SKU: Enter the Stock Keeping Unit for your product. This is a unique identifier for tracking inventory.
Manage Stock?: Check this box if you want to manage stock for this product manually.
Stock Status: Select the current stock status of the product. The default option is “In stock”.
Sold Individually: Check this box if you want to limit the product to one per order.
Allow Backorders?: This option should always be set to “Do not allow” to prevent customers from ordering out-of-stock items.
Make sure to fill out these fields accurately to ensure proper inventory management.

Upload Type
This section is essential for uploading digital/downloadable files associated with your product. You must fill this out if your product type is marked as "Upload".

- Name: Enter the file name as it will appear to the customer (e.g., "Ebook Chapter 1").
- File Upload: Click the "+" icon to browse and upload your file, then click Upload.
- Download Limit: Specify how many times the file can be downloaded. Leave empty for unlimited.
- Download Expiry: Set how many days after purchase the file can be accessed. Leave empty for no expiry.
- Accepted File Types: PDF, ZIP, MP4, MOV, DOC, PPT, JPG, PNG, MP3, etc.
Note: These fields are required only if the product is marked as Upload.

Finalizing Your Product
At the bottom of the page, you will find the submit button:
Submit: Click this button to save and publish the product to your store. This will make the product available for customers to view and purchase.
Make sure to review all the information before clicking “Submit” to ensure everything is accurate and complete.

Create a Bookable Product
1 Access the Products Section
- First, we need to click on the “products” option in the sidebar menu.
2 Create a New Product Next, click on the “Add New” button to add a new product.
3 Configure the Product
Now, we can start creating the new product. You can select "Bookable Product" option from the dropdown.
These four options represent the type of product we want to create:
Catalog: Show or hide the bookable product from the public catalog.
Include Resources: Assign and manage shared resources like rooms or staff.
Include Additional People: Allow multiple participants in a single booking.
Virtual: Mark the booking as an online service without physical delivery.

Booking Product - Fill in Product Information
Product Title: Enter the product title here.
Add Description and Media
Short Description: Add a brief description of the product.
Description: Provide a more detailed description of the product.
Add Media: You can add images or videos of the product by clicking on “Add Media”.

Add Categories and subcategories
Categories: Select the appropriate categories for your product. This helps in organizing your products and makes it easier for customers to find them.
For now, the Brands and Tags sections will not be used. Ensure that you provide as much information as possible and use high-quality images to attract potential customers. Once you have filled out all the fields, you can publish the product to make it available on your website.
Bookable Product - Fill in Product Information
Meeting duration: Select Meeting Duration, It can be Minutes, hours or Days
Calendar display mode: Select Calendar display settings
Requires confirmation?: If you want to provide confirmation from user then check it otherwise leave it unchecked.
Can be cancelled?: If you want to provide option to cancel a meeting then check it otherwise leave it unchecked.

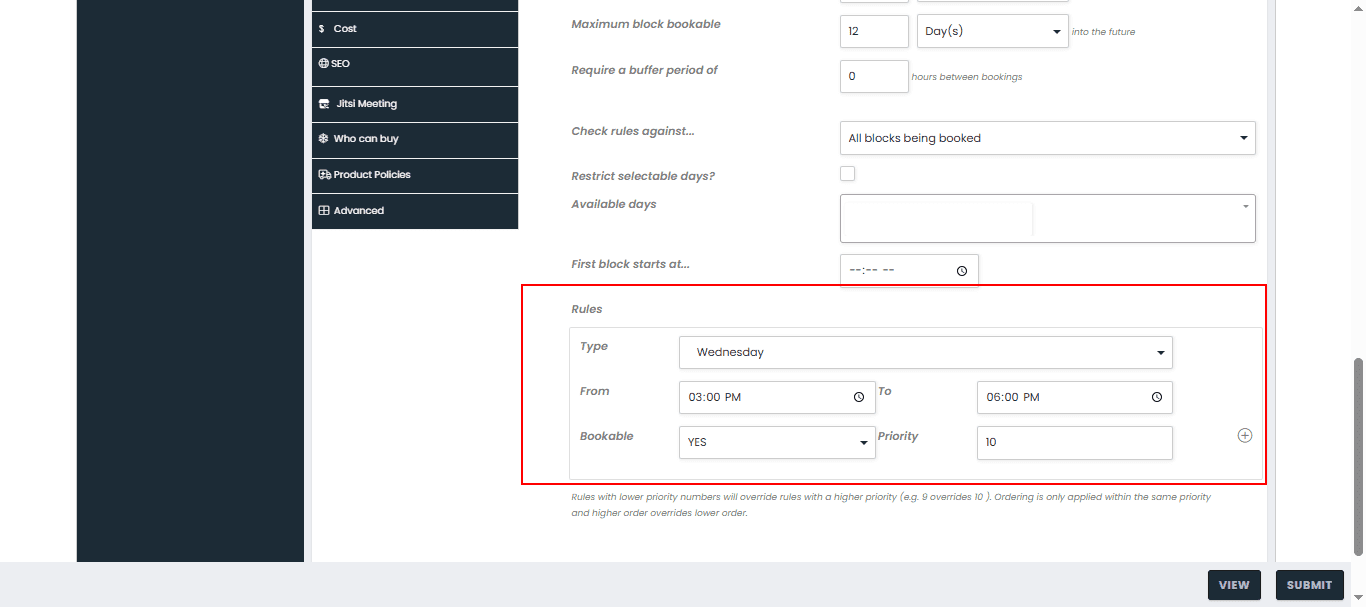
Bookable Product – Availability Settings
Max bookings per block: Defines how many customers can book a single time block.
Minimum block bookable: The minimum lead time before a booking can be made.
Maximum block bookable: The maximum number of months into the future that bookings are allowed.
Require a buffer period of: The number of hours required between bookings.
Check rules against...: Controls how rules are validated.
• All blocks being booked – Checks availability for every block in the booking duration.
• Other options may include start or end block depending on the plugin.
Restrict selectable days?: If checked, only the selected weekdays will be available for booking.
Available days: Days when bookings are allowed (e.g., Monday to Friday).
First block starts at...: The time the first bookable block of the day begins (e.g., 09:00 AM).

Bookable Product – Cost Settings
Base cost: This is a one-time fixed fee added to any booking.
Block cost: The cost charged per block (e.g., per hour, day).
Display cost: This is optional and only affects what customers see on the front end.
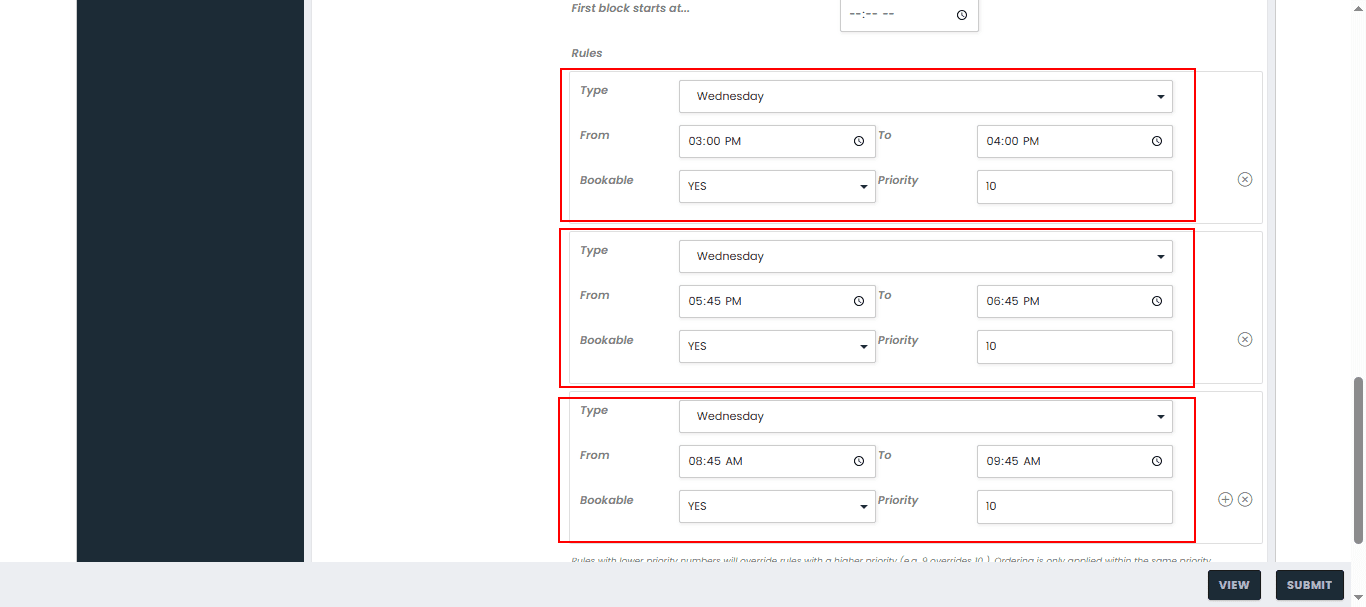
Rules Section
Cost rules let you override or adjust pricing based on date ranges, seasonality, or other conditions.
Type: Rule type. Currently shown as Date range.
From / To: The date range during which this rule applies.
Base Cost (Rule Override): You can increase (+), decrease (-), or set (=) the base cost.
Block Cost (Rule Override): You can increase (+), decrease (-), or set (=) the block cost.
+ (Add button): Click to add multiple rules.

Bookable Product – Meeting
Jitsi Meeting: Check this option if you want to add meeting on this bookable product.

Time Slot Handling and Time Zone Conversion
Vendor Time Zone (Local Setup): All availability and meeting time slots are created based on the Vendor’s local time zone. For example, if the Vendor is located in the U.S. (EST), they may set availability from 4:00 PM to 6:00 PM EST.
User Time Zone (Auto-Detected): On the booking front-end, the system automatically detects the user’s local time zone and converts all available time slots accordingly. This ensures that users see timings relevant to their location.
Example: If the Vendor has configured a time slot for 4:40 PM EST, a user located in India (Asia/Calcutta time zone) will see this same time slot as 2:10 AM IST the next day.
This automatic adjustment removes any confusion about availability or meeting time, allowing users from different parts of the world to easily book a meeting that aligns with their schedule.
Display on Booking Page: On the front-end booking form, the time zone is clearly displayed above the calendar or time slots. This reassures users that the times shown are in their local time zone.
Important: Even though time zones differ, the booking slot that gets saved in the backend is always based on the Vendor’s local time. The system handles the conversion logic automatically.
📌 Tutorial: Understanding Time Slot Options for Vendors
WooCommerce Bookings allows two ways of handling availability:
1. Multiple Time Slots per Day
If the Vendor sets availability in short intervals (e.g., every 30 minutes or 1 hour), you will see several options on the same day. This is useful when the Vendor is taking multiple short consultations per day.
How to Book: Simply click on your preferred time slot (e.g., 10:00 AM, 11:00 AM, or 2:00 PM) and proceed.
2. One Slot per Day
If the Vendor allows only one booking for the entire day, you will see just a single option per date. This is common when meetings are longer (e.g., half-day or full-day engagements).
Important: If you enter only one time slot (e.g., Wednesday at 10 AM), WooCommerce will automatically repeat that slot every Wednesday. If you want a single, non-repeating day, you need to set the availability as a specific date instead of a recurring weekday.
Tip: In the product settings, go to Availability → Rules, and choose a specific calendar date to avoid the slot repeating every week.
Finalizing Your Product
At the bottom of the page, you will find submit button:
Submit: Click this button to save and publish the product to your store. This will make the product available for customers to view and purchase.
Make sure to review all the information before clicking “Submit” to ensure everything is accurate and complete.

How to Book a Meeting
Follow the steps below to schedule a video meeting and understand how time slots adjust to your time zone.
1 Go to the Booking Page: Navigate to the meeting booking page on the website.
2 Select a Service or Meeting Type: Choose the type of consultation or meeting you'd like to book from the list of available services.
3 Choose a Time Slot: The available time slots are based on the Vendor’s availability, which is set in their local time zone.
However, you will see the time slots in your own time zone. This ensures there’s no confusion about the booking time.
For example, if the Vendor set availability for 4:40 PM EST, and you're in India (Asia/Calcutta), the slot will appear as 2:10 AM IST for you.

How to Book: Select the day you prefer. Since only one booking is allowed, the day will become unavailable for others once you confirm.
Tip: If you do not see your preferred time, it may already be booked. Try another day or choose from the remaining slots.
This flexibility ensures that the system can handle both short sessions (multiple slots per day) and longer sessions (single slot per day), depending on the Vendor’s setup.
4 View Cart: Click the cart icon in the header or use the "View Cart" link to review your selected items.
5 Proceed to Checkout: On the cart page, click "Proceed to Checkout".
6 Login/Register: If user is already logged in then it will redirect to checkout page otherwise user has to login/register with their account first to proceed further.
7 Enter Billing Details: Fill in your billing and shipping information as required.
8 Choose Payment Method: Select your preferred payment method and check the "Terms and Conditions" box.
9 Place the Order: Click the "Place order" button to complete your purchase.
Once the order is placed, you will receive an order confirmation on screen and via email. You can track your order status and meeting link from the My Account section as well as on your registered email account
10 Join the Meeting: At the scheduled time, use the link in the confirmation email to join the Jitsi Meet session.
This setup makes it easy for users from any location to book meetings in their own local time while ensuring the Vendor's availability is respected.
How to Place an Order on Our WooCommerce Store
Follow these steps to select a product and place an order easily:
1 Go to the Shop Page: Navigate to the Shop page from the main menu to browse available products.

2 Select a Product: Click on the product you want to purchase to view its details.
3 Add to Cart: Choose the quantity (if applicable), and click the "Add to Cart" button.

4 View Cart: Click the cart icon in the header or use the "View Cart" link to review your selected items.

5 Proceed to Checkout: On the cart page, click "Proceed to Checkout".

6 Login/Register: If user is already logged in then it will redirect to checkout page otherwise user has to login/register with their account first to proceed further.

7 Enter Billing Details: Fill in your billing and shipping information as required.
8 Choose Payment Method: Select your preferred payment method and check the "Terms and Conditions" box.
9 Place the Order: Click the "Place order" button to complete your purchase.

Once the order is placed, you will receive an order confirmation on screen and via email. You can track your order status from the My Account section.

How to Create a Store Using WooCommerce Vendor Plugin
Follow these steps to register as a vendor and set up your store:
1 Go to the Vendor Registration Page: Navigate to the "Become a Vendor" or "Vendor Registration" page from the website's main menu.

2 Choose the Plan:
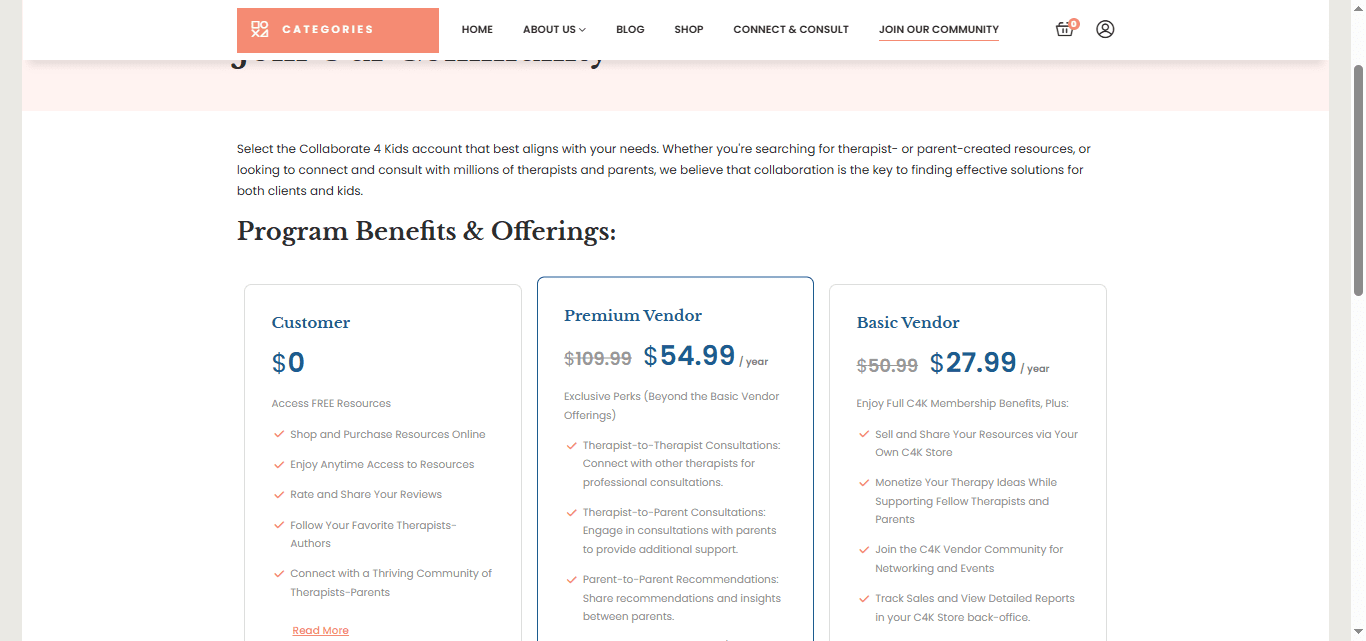
3 Fill in the Registration Form: Enter your store name, email address, password, and any other required information.

Agree to Terms: Read and accept the vendor terms and conditions by checking the box.
Submit the Form: Click the "Register" button to submit your application.
Wait for Approval (if required): Some sites require Vendor approval before you can start selling. You will be notified via email once approved.
4 Login to Vendor Dashboard: Once approved, log in to your account and access the Vendor Dashboard.
5 Set Up Store Details: In the dashboard, fill in your store description, logo, banner, address, contact details, and payment information.

6 Add Products: Go to the "Products" section, click "Add New", fill in product details, set price, upload images, and publish.

7 Start Selling: Your store is now live! Customers can browse and purchase your products.
Once your store is active, you can manage orders, track sales, and communicate with customers directly from your Vendor Dashboard.
How to Search for a Therapist on Collaborate4Kids
To find a therapist near you, use the search filters located on the Connect & Consult page. You can refine your search by:
1 Store Name: Type the store’s name if you know it.
2 Category: Choose from various categories of therapy or services.
3 Location: Select the country or region.
Once you set the filters, the map and list of available therapists will update to show relevant results.

By following these simple steps, you can connect and consult to therapist on Collaborate4Kids website.